I promised my students that I would post this demo of the block-in technique we worked with this week in class. I must give credit to Kevin MacPherson, who teaches this approach in his workshops and book, "Fill Your Oil Paintings with Light & Color". (Please read it for further explanation and fabulous examples.)
Blocking-In with Simple Shapes and Values...

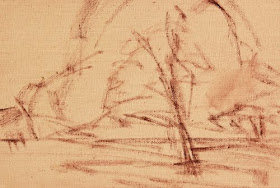
Sketch. Begin with a simple, outline sketch of your subject for placement purposes and overall composition of canvas only. Keep loose and avoid detail.

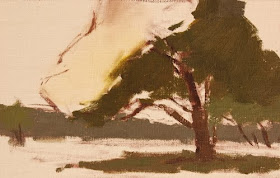
Colorful shadows first. Paint shadow patterns throughout canvas - using best average color and value for each area. Keep shapes simple and flat; you are still avoiding any detail or modeling.
.

Fill in lights. Paint light patterns throughout canvas - again using best average value and color for each area. Canvas will be covered; shapes will be simple, flat and undetailed. "Block-in" is complete at this point. Double check value and color relationships and make any needed corrections.
.
.
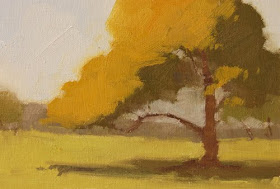
The Finish. This is where individual mark-making, personal finessing, and adding desired detail takes place. Using subtle value changes and temperature shifts, break up large masses (only as needed - this is easy to overdo). Be careful to keep shadow family and light family separate (subtle shifts stay within each family.) Step back often and quit before you go too far. RESTRAINT is a good word to keep in mind.
.
The point of this block-in approach is to work quickly to cover the canvas with accurate value and color. When details are added too soon, we get attached to those details and lose objectivity. We resist making important corrections because of that loss.
.
Finally, this should all be fun so enjoy the process. That is the most important part. :)


Bravo! I have been struggling with overdoing the details and plan to try this soon. Thanks.
ReplyDeleteSounds SO easy. . . .
ReplyDeleteSigned, student
Thank you for this informative demo! I have learned so much from all the generous artists that share. It is simply wonderful!!
ReplyDeleteYour painting is lovely! And you make it look so easy!!
This is great. I love to see how you get those superb results. It's almost like being there.
ReplyDeleteXOXOXOBarbara
Thanks, I love seeing how artists form their paintings.
ReplyDeleteYou really broke down Kevin's approach in to manageable, understandable steps! That is a great demo. Thanks for sharing!
ReplyDeleteThanks for the demo! I will try that approach on my next landscape...I tend to focus too much on details and miss the big picture.
ReplyDeleteThanks for the demo, nice to see.
ReplyDeleteI LOVE this little painting.
Thanks for posting this...I'm always curious to see your working methods.
ReplyDeleteWhen you work on a gray day, do you still separate out your darks and lights as you've done here, or would you block in the whole shape (tree, for example) with one average color because the values are so much closer, and then add subtle lights on top of that...or would you still separate lights/darks?